Samba (SMB) Server


# STEP7

# install samba server client (Windows file sharing)
# optional pkgs update

  1. $ sudo apt-get update


  1. $ sudo apt-get install samba samba-common smbclient samba-common-bin smbclient cifs-utils

# select <no> on prompt

# mount your music library (should be shared to everyone, password not required)

# in this example “Music” is your samba share that contains the music files,
# the IP address is the PC Host
# so path to \\ServerNAS\Music
# is replaced by
# //192.168.x.x/Music

# IMPORTANT to go further you need to know:
# the IP address of your server containing your music files
# the name of the shared directory
# and login/password of the share point if you cannot get access to the directory as guest

# if /mnt/media/ directory not exist create it

  1. $ ls /mnt/media/
  2. $ sudo mkdir /mnt/media


Mount Your Music Library - Read More...
# skip this part and click NEXT button if you intend to put your music library in local hard drive

# mount music library

  1. $ sudo mount -t cifs -o username=Guest,password=,vers=1.0 //192.168.x.x/Music /mnt/media


# username+password can be filled with your credentials, in this case ‘vers=1.0’ must be skipped:

  1. $ sudo mount -t cifs -o username=myname,password=mypasswd //192.168.x.x/Music /mnt/media


# SBM1 EXAMPLE if the IP of your NAS is 192.168.1.10:

  1. $ sudo mount -t cifs -o username=guest,password=,vers=1.0 //192.168.1.10/jukebox /mnt/media


# check if this is correctly mounted type:

  1. $ df -h


# your share point should be in the list and music files are available from /media/music

# result in last line should be for example:
# //192.168.x.x/Music 932G 655G 277G 71% /media/music

  1. $ ls /mnt/media


# the list contains your music files


Auto Mount Your Music Library At Startup - Read More...

# AUTO MOUNT THE MUSIC LIBRARY
# auto mount your music library at startup is easy

# edit fstab type

  1. $ sudo nano /etc/fstab


# example add the following line at end and change //192.168.x.x/Music to your values

# example1: connect as guest to \\MyNAS\Music directory (change to the IP of your NAS server and the name of shared directory)

//192.168.x.x/Music /mnt/media cifs username=guest,password=,vers=2.0,x-systemd.before=mpd.service,x-systemd.device-timeout=10s 0 0

# example2: enter your IP and change myname/mypasswd to your values:

//192.168.x.x/Music /mnt/media cifs username=myname,password=mypasswd,x-systemd.before=mpd.service,x-systemd.device-timeout=10s 0 0

# example3: with _netdev to wait for network:

//192.168.x.x/Music /mnt/media cifs username=guest,password=,_netdev,x-systemd.before=mpd.service,x-systemd.device-timeout=10s 0 0

# example4: SMB v2 with pi user:group and 755 permissions:

//192.168.x.x/music /mnt/media cifs username=guest,password=,vers=2.0,uid=1000,gid=1000,dir_mode=0755,file_mode=0755,x-systemd.before=mpd.service,x-systemd.device-timeout=10s 0 0

# complete example with:

– “\\NAS\music” library Windows share point (NAS IP address: 192.168.1.62),

– login as guest force SMB v1 (vers=1.0),

– waiting for network ( _netdev param)

//192.168.1.62/Music /mnt/media cifs username=guest,password=,vers=1.0,_netdev,x-systemd.before=mpd.service,x-systemd.device-timeout=10s 0 0

# example using systemd to check network availability and mount before mpd:

//192.168.x.x/Music /mnt/media cifs rw,uid=1000,gid=1000,nofail,username=dummyusr,password=dummypw,iocharset=utf8,x-systemd.before=mpd.service,x-systemd.after=network-online.target,x-systemd.after=systemd-resolved.service 0 0

# CTRL+O to save
# CTRL+X to exit

#
# x-systemd.before=mpd.service explanation:
# It is necessary to be sure the mount point is available before running the MPD service
# and also necessary to stop the MPD service before unmounting your library (/mnt/media/)
# otherwise, if you reboot or shutdown with your MPD status is in pause or playing
# the mount point will be busy and systemd unmount filesystem will fail and can take
# a while (more than 120s) to reboot.
# mount library

  1. $ sudo systemctl daemon-reload
  2. $ sudo mount -a

# to list all shared point type:

  1. $ findmnt -l

# only cifs:

  1. $ findmnt -t cifs

# at this point you may check and fix if needed your fstab entry by
# rebooting the device and checking ls /mn/media/ directory which should contains your song files


CIFS Mounts Disconnecting Issue - Read More...
#
# if you are using SMB v1 and after a couple of hour your /var/log/syslog is fulfilled of

CIFS VFS: Server 192.168.x.x has not responded in xxx seconds. Reconnecting...

# then you need an extra step to maintain your smb connection
# add the following script in scripts/ directory

  1. $ sudo nano ~/scripts/smb_v1_fix.sh
#!/bin/bash

while read spot; do
   touch --no-create "${spot}/.smb_v1_fix"
done <<< "$(mount | awk '/cifs/{ print $3; }')"

# CTRL+O to save
# CTRL+X to exit

# set the permission

  1. $ sudo chmod +x ~/scripts/smb_v1_fix.sh

#
# create an empty (hidden)file in your mounted library for simply touching it

  1. sudo touch /mnt/media/.smb_v1_fix

# add a cron job to run the script every 10 mn

  1. $ sudo nano /etc/cron.d/smb_v1_fix
*/10 *   *   *   *   root    /home/pi/scripts/smb_v1_fix.sh >/dev/null 2>&1

# CTRL+O to save
# CTRL+X to exit

# the status of your cron job can be checked easily

  1. $ sudo systemctl status cron

# also in system log

  1. $ sudo grep -a "smb_v1_fix.sh" /var/log/syslog

Click the button NEXT below to continue…

DHCP vs Static IP


# OPTIONAL STATIC IP

# identify your ethernet card name usualy eth0 or enp3s0

  1. $ ip link show

# A DHCP CONFIG IS PERFECTLY VALID for building your Audophile Server,
#
# DHCP Reservation service (included in your netbox/router) provides an IP address to a specific client based on it’s physical MAC address.
# the device will always get the same IP address and it will never change as soon as you do not replace your Ethernet card.

# check /etc/network/interfaces and add the following DHCP entries if missing

  1. $ sudo nano /etc/network/interfaces

# if your eternet card is eth0

auto eth0
iface eth0 inet dhcp

# or if it’s enp3s0 (amd64 Gigabyte Brix)

auto enp3s0
iface enp3s0 inet dhcp

# or if it’s enp2s0 (amd64 Intel NUC)

auto enp2s0
iface enp2s0 inet dhcp

# CTRL+O to save
# CTRL+X to exit

# or if netplan is used (Ubuntu 22.04 amd64) you can make a generic config
# to match any Ethernet adapter

  1. $ sudo nano /etc/netplan/00-installer-config.yaml
network:
  ethernets:
    eth:
      match:
        name: en*
      dhcp4: true
  version: 2

# CTRL+X then Y to save

# for amd64 check dmesg in case of error type:

  1. sudo dmesg
... firmware: failed to load i915/glk_dmc_ver1_04.bin (-2)

# install the realtek firmware and reboot
# add the non free repo to sources list

  1. sudo nano /etc/apt/sources.list

# add these lines

deb http://deb.debian.org/debian bullseye-backports main contrib non-free
deb-src http://deb.debian.org/debian bullseye-backports main contrib non-free

# update pkgs

  1. $ sudo apt update

# install firmware

  1. $ sudo apt install firmware-realtek
  2. $ sudo apt install firmware-misc-nonfree
  3. $ sudo reboot

# open your router dhcp setting and “reserve” the IP address of your audio server
# to skip the STATIC IP tutorial below
# go to the bottom page and click the NEXT POST button


Static IP Address - Click To Read More...
# identify your ethernet card name usualy eth0 or enp3s0

# WIFI IS NOT RECOMMENDED, remove your wifi card from your device

# and configure a static IP address in /etc/dhcpcd.conf:


# Static IP on Raspberry PI 4


  1. $ ip link show
1: lo: <LOOPBACK,UP,LOWER_UP> mtu 65536 qdisc noqueue state UNKNOWN mode DEFAULT group default qlen 1000
2: eth0: <BROADCAST,MULTICAST,UP,LOWER_UP> mtu 1500 qdisc pfifo_fast state UP mode DEFAULT group default qlen 1000
3: wlan0: <BROADCAST,MULTICAST> mtu 1500 qdisc noop state DOWN mode DEFAULT group default qlen 1000

# eth0 is your default interface (Ethernet connection), do not use wifi for your audio server

# if eth0 is NOT VISIBLE then pass net.ifnames=0 to the kernel cmd by adding this at the beginning of /boot/cmdline.txt and reboot

  1. $ sudo nano /boot/cmdline.txt


# save
CTRL+X then Y then ENTER

  1. $ sudo reboot

# to configure statis ip address

  1. $ sudo nano /etc/network/interfaces

# add the following lines at end (remove dhcp lines):

auto eth0
iface eth0 inet static
address 192.168.x.x
netmask 255.255.255.0
network 192.168.x.x
gateway 192.168.x.x

# example:

auto eth0
iface eth0 inet static
address 192.168.1.75
netmask 255.255.255.0
network 192.168.1.0
gateway 192.168.1.1


# Static IP on amd64 (Intel NUC, Mini PC,…)


# ON AMD64 PC

  1. $ ip link show
1: lo: <LOOPBACK,UP,LOWER_UP> mtu 65536 qdisc noqueue state UNKNOWN mode DEFAULT group default qlen 1000
2: enp3s0: <BROADCAST,MULTICAST,UP,LOWER_UP> mtu 1500 qdisc pfifo_fast state UP mode DEFAULT group default qlen 1000
3: wlp2s0: <BROADCAST,MULTICAST> mtu 1500 qdisc noop state DOWN mode DEFAULT group default qlen 1000

# enp3s0 is your default interface (Ethernet connection), do not use wifi for your audio server

  1. $ sudo nano /etc/network/interfaces

# add the following lines at end:

auto enp3s0
iface enp3s0 inet static
address 192.168.x.x
netmask 255.255.255.0
network 192.168.x.x
gateway 192.168.x.x

# address = the choosen static IP address, EXAMPLE: 192.168.1.20
# network = your IPs range, EXAMPLE: 192.168.1.0
# gateway/router = your internet box LAN IP, EXAMPLe: 192.168.1.1

# CTRL+O to save
# CTRL+X to exit


  1. $ sudo systemctl restart networking


# get the status

  1. $ sudo systemctl status networking


# if everything okay reboot your system

  1. $ sudo reboot


# or type this cmd below with interface name (eth0 or enp3s0 ) and reboot manually

  1. $ sudo ifdown enp3s0


# here you’re loosing your SSH session obviously

# see troubleshooting page if static IP not working

# reboot system

# and start the NEW SSH SESSION WITH YOUR NEW STATIC IP! 😉


# STEP6
# to continue open SSH session with this time your new static IP address this time

# (click yes and accept the new certificate)

  1. $ login pi

Click the button NEXT below to continue…

SSH Session


# STEP3

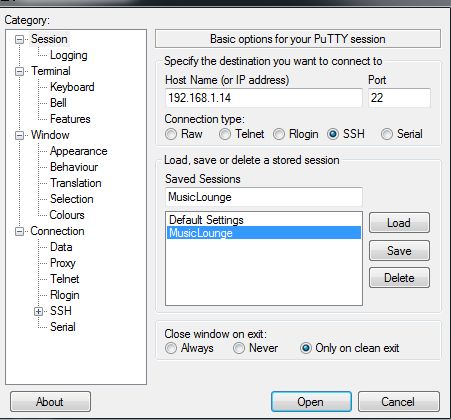
# Now you have the IP assigned to your device, you need to start a ssh session from your (remote) PC,
# this is required to enter the commands and update/install all packages

# putty.exe utility is recommended on Windows, obviously Terminal app will be used on Linux and MacOS:
https://www.chiark.greenend.org.uk/~sgtatham/putty/latest.html

# on other OS, use SSH app or Terminal with ssh pi@192.168.x.x

# click yes and accept the fingerprint key the first time you connect to audio server

# For Linux noob the $ prefix in all commands on this website must NOT be copied, the ‘$’ prefix symbolizes the prompt


# Start the SSH session on Raspberry PI

  1. $ login pi

# use the password of user pi your created during the installation (read the installation and activation of SSH on Debian 12 bookworm),
# ‘raspberry’ is the password by default of the Raspberry PI device

# all basic steps done! now you have the prompt:

  1. pi@raspberrypi:~ $

# to change your password
# (password of our MusicLounge Audiophile distribution is musiclounge )

  1. $ passwd

# START on other distro with only root user,
# we recommend to add a user “pi” (or other name) to mach all our tutorials
# if you use a minimal Ubuntu/Debian distro for Odroid or other boards

# we strongly suggest to read carefully the tutorial to prepare your linux distro before going further

Prepare Your Minimal (light) Linux Distro
https://linuxaudiofoundation.org/misc-preparing-a-minimal-linux-distro-odriod-c2-example/


#
# Congrats! your linux distro is ready, an ssh session is pending
# and the user pi has been created

# add user to sudoers after installation

  1. $ sudo nano /etc/sudoers

# add the line below after root ALL=(ALL:ALL) ALL
# replace <pi> by your username

pi ALL=(ALL:ALL) ALL

# also, add www-data to allow driving the alsa equalizer (edition 2024)

www-data ALL=(mpd) NOPASSWD: /usr/bin/amixer

# save
CTRL+X then Y then ENTER
# create at least Downloads and scripts directories if they do not exist

  1. $ mkdir Downloads
  2. $ mkdir scripts

# ready to start!


# STEP4

# intial configuration, change the default hostname

# skip this step if you already configure the hostname musiclounge during the installation process

# if you intend to create a multi-rooms audiophile configuration sharing the same music library on your LAN network
# do not forget to change the hostname to avoid conflict between each audio server (see the corresponding tutorial)
# we suggest a name including ml for musiclounge followed by the room name (e.g mlbedroom, mllivingroom, mlkitchen,…)

# check your current settings

  1. hostnamectl

# and change it to musiclounge if needed


# on Raspberry PI type:

  1. $ sudo raspi-config

# 0 network options: hostname choose replace raspberrypi by musiclounge for example
# 1 setup localisation choose with SPACE bar en US UTF8 only
# 2 expand SDCARD partition (Advanced Options/Expand)


# on Odroid C4 (Armbian arm64)
# launch armbian-config to make the same changes on ARM based device like on the Odroid C2 or C4

  1. $ sudo armbian-config

# to change the hostname manually

  1. sudo hostnamectl set-hostname musiclounge

# check the hostname

  1. hostnamectl

# check /etc/hostname entry

  1. $ sudo nano /etc/hostname
musiclounge

# check /etc/hosts entry

  1. $ sudo nano /etc/hosts
127.0.0.1       localhost
127.0.1.1       musiclounge

# The following lines are desirable for IPv6 capable hosts
::1     localhost ip6-localhost ip6-loopback
ff02::1 ip6-allnodes
ff02::2 ip6-allrouters


# Optional sanity check

  1. sudo apt update
  2. sudo apt upgrade -y

# reboot the system

  1. sudo reboot

# restart a SSH session

  1. $ login pi

Click the button NEXT below to continue…
IP Of The Server


# STEP2

# get the IP of your audio server

# This is your first boot!
# but before building your audio server you need the IP assigned by your router (integrated dhcp server ) to your device

# in case of error or no IP found, check the DHCP vs Static IP tutorial to
# configure correctly your network interface and go back to this page, here

# try to ping the server (ping musiclounge),
# open terminal or commands prompt and type:

# if the command return an IP v6 address add the param -4 like

c:\>ping musiclounge -4

# you can scan your NETWORK to get the IP address of your audio server if needed
# from any tools or router settings or whatever, internet is your friend
# tools like those ones:

# from linux

  1. $ nmap -sP 192.168.x.x/24

# from macos (type “brew install nmap” if cmd not found)

  1. $ nmap -sP 192.168.x.x/24

# from windows cmd prompt
# C:\Windows\System32>arp -a

# double check by using ping cmd:
# ping 192.168.x.x

# or if you have keyboard/monitor connected to your rPI, login and type:

  1. $ ifconfig

# eth0 entry should contain the IP address

Click the button NEXT below to continue…

MusicLounge: Introduction


# BUILDING THE MUSICLOUNGE AUDIOPHILE SERVER


# STEP1

# A minimum knowledge in shell/bash (typing commands on a terminal using a SSH session with putty for example) is required.
# Internet is your friend! the scope of this project is not to teach linux or how to create a bootable SDCARD from an image file or how to use a SSH session to manage your server wiressly or how to type a command in a shell. 😉
# Simply read carefully instructions and double-check them before applying and everything will be fine.

# the MusicLounge Audiophile Server is reliable and daily used since a while now (more than a decade) and works flawlessly.

# the storage must be already done (see previous post if not ready)

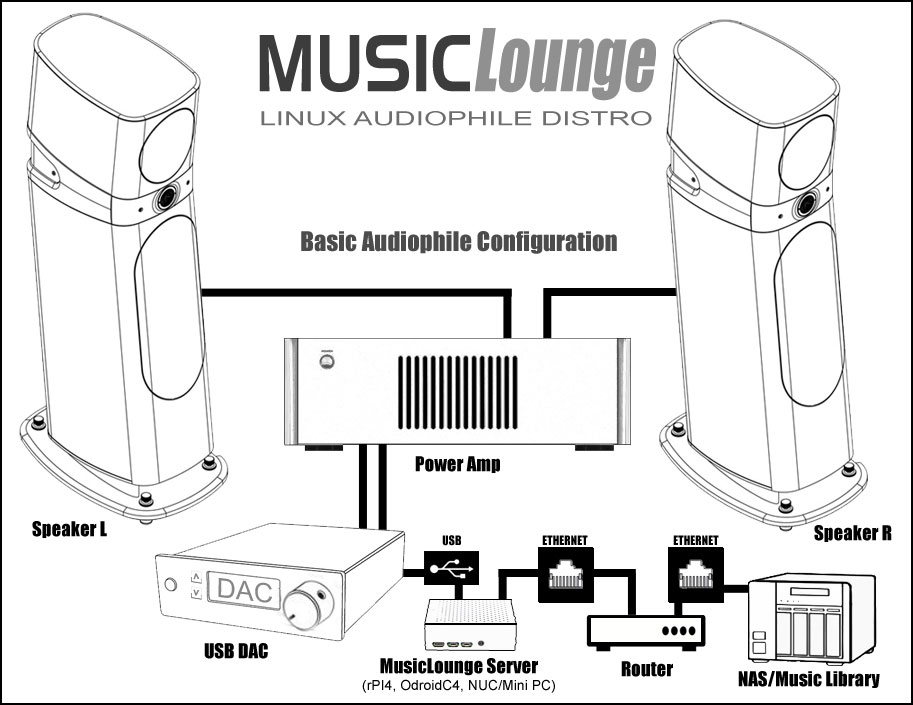
# insert the SD card or USB stick inside the device (Raspberry PI 5 and PI 4, NUC, Ordroid C4, …)

# connect the device to your LAN network using the Ethernet cable (NOT WIFI)

# connect your USB cable from your USB DAC to the device
# (Connecting the usb dac to a powered usb hub maybe required)

# connect your power supply (3A minimum for rPI4 – linear regulated if possible)

# Boot your device!

Click the button NEXT below to continue…


GETTING STARTED WITH MUSICLOUNGE DISTRO


GETTING STARTED WITH MUSICLOUNGE AUDIOPHILE DISTRO


IMPORTANT:
Linux Kernel v4.19.64 or greater is needed to play native DSD, check the kernel version of your Linux distro before building our audiophile server.

ODROID C4 BOARD
# for Odroid C4 take the Armbian distro preferably as the Official Hardkernel Ubuntu distro is outdated.
https://www.armbian.com/odroid-c4/#kernels-archive-all

RASPBERRY PI 5 or PI 4
Download Raspberry Pi OS Lite (64Bit)
Minimal image based on Debian 12 bookworm OS for Raspberry
https://www.raspberrypi.org/software/operating-systems/

INTEL and AMD PC (AMD64)
Download Ubuntu 20.04.2 (Jammy) live server for amd64 which have a 6.03 kernel version
or Debian 11 Bullseye Netinst or Standard for amd64 with kernel version 5.15+
Minimal image amd64 (64 Bit) based for INTEL and AMD PC (NUC, PC, BRIX,…)
https://releases.ubuntu.com/jammy/
https://www.debian.org/releases/bullseye/

OTHERS DEVICES
Download Armbian Focal or Buster (Debian Buster 64Bit based) Lite for arm64
Minimal image based on Debian Buster 10 OS for a lot of boards using ARM
# armbian buster headless
https://www.armbian.com/download/


# Our MusicLounge Audiophile server distribution is provided for your convenience. The MusicLounge Audio Server is strictly based on the following distributions on which we have applied all the instructions provided on our website in order to make your job easier, however we strongly suggest to read our tutorials to get a full control on your audio system and customize your installation.

# Edition 2024

# for Raspberry PI 5 and PI 4 (64 Bit)
# Raspberry Pi OS Lite (bookworm – Debian 12) with Linux 6.6.20+, MPD 0.23.15, myMPD 15.02, Digital EQ, WEB Ready with PHP8.2,…
# img base: https://www.raspberrypi.org/software/operating-systems/
# source code: https://github.com/raspberrypi

# Edition 2023

# for the Odroid C4 arm64
# Armbian 22.11.4 Jammy core with Linux Kernel 6.0.13-meson64
https://www.armbian.com/odroid-c4/
Sour code: https://github.com/armbian

# for the Raspberry PI 4 armhf (32 Bit)
# Raspberry Pi OS Lite (bullseye) with Linux 5.15 – https://www.raspberrypi.org/software/operating-systems/
# Source code: https://github.com/raspberrypi

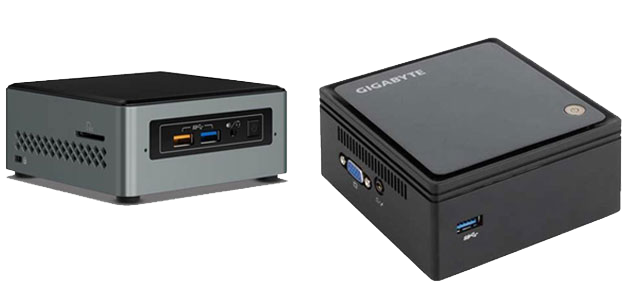
# for barebone x64 PC on amd64 platform (Intel NUC, Brix, …) we recommend Debian or
# Debian 11 NETINSTALL or standard https://www.debian.org/CD/http-ftp/#mirrors
# debian-live-11.6.0-amd64-netinst.iso or debian-live-11.6.0-amd64-standard.iso
# Source code: https://github.com/Debian


# Edition 2021

# for the Odroid C4
Sour code: https://github.com/armbian

# for the Raspberry PI 4
# Source code: https://github.com/raspberrypi

# for any barebone PC (Intel NUC, Brix, …)
# Source code: http://cdimage.ubuntu.com/releases/20.04/release/source/


# use “Win32 Disk Image” on Windows to create the SDCARD (8GB)
https://sourceforge.net/projects/win32diskimager/

# use rufus for creating a bootable usb stick with amd64 linux (Intel PC/NUC, Brix,…)
https://rufus.ie/en_US/#

# Notepad++ powerful text editor
https://notepad-plus-plus.org/downloads/

# on barebone PC with internal SSD use HDD Raw Copy 1.10+ Portable from HDGuru.com to clone the img to the SSD


Before going further, the info below is required:
– your gateway / router (internet box) / DNS IP address are required (192.168.x.x)
– if you’re not planning to store musics locally, the ip of your NAS or server PC with the sharing directory containing the music files is required (192.168.x.x)


# VERY IMPORTANT – SSH ON RASPBERRY PI

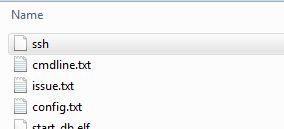
# RPI4 with Debian 11 (buster) only: add a empty file named “ssh” without extension (an empty file created with Notepad++ for example) to activate SSH at startup

# RPI4 or 5 only: edit cmdline.txt with notepad++ for example and add net.ifnames=0 at the beginning

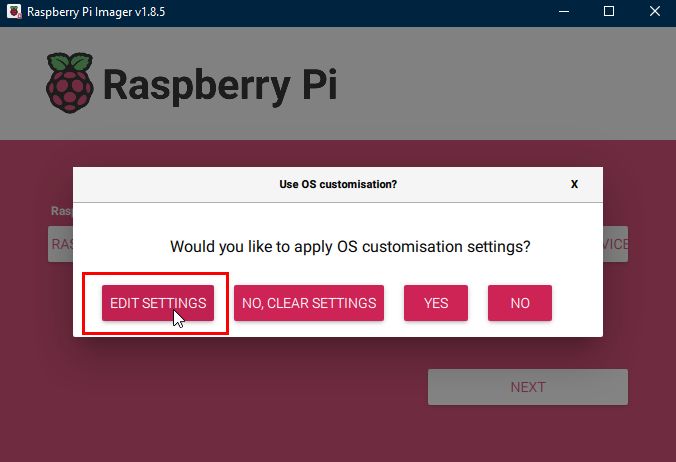
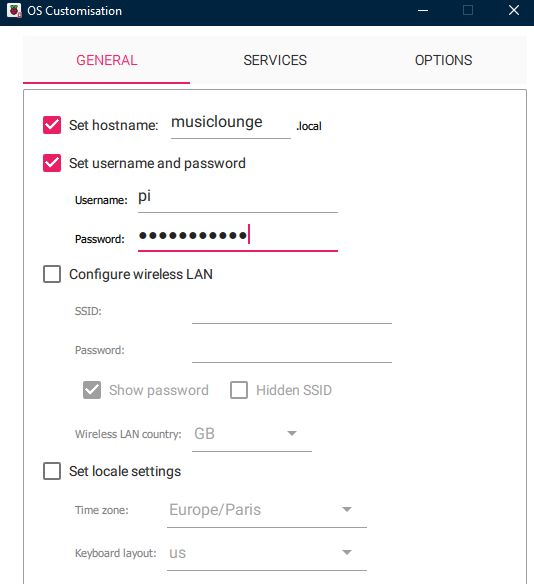
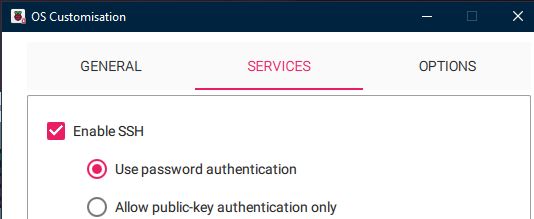
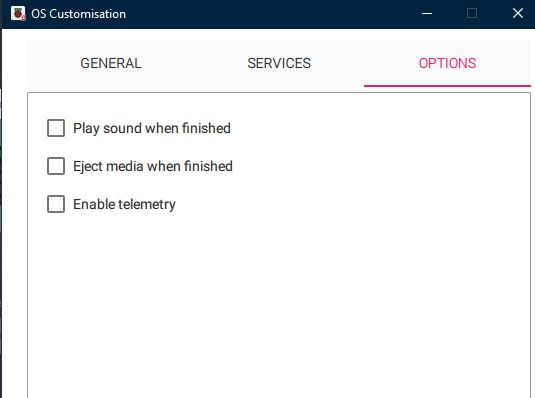
# on RPI4 or RPI5 with Debian 12 (bookworm): use the Raspberry Pi Imager to setup the hostname, the user account and ssh.

Or after the creation of your SDCARD just download and extract the files from the zip archive below onto your sdcard (ssh login:pi and password:musiclounge).
raspberry_boot_files


# Quick Overview:

# create the SDCard with raspiOS or debian lite or armbian or Odroid Ubuntu minimal distro (see the link above)

# DO NOT INSTALL Any Graphics Desktop Environments (GUI), we are building a HEADLESS server…

# insert the SD card inside the device

# connect device to your LAN network using the Ethernet cable

# connect your USB cable from your USB DAC to the device
(for raspberry pi 3b+ connect the usb dac to a powered usb hub and usb hub to the raspberry pi)

# connect your power supply (3A minimum for rPI 4, linear regulated power supply is better)

# Boot your device, start an ssh session from a remote PC and follow our tutorials to install and setup your audiophile server.

Click the button NEXT below to continue…

MUSICLOUNGE AUDIO DISTRO SYSTEM/SOFTWARE REQUIREMENTS


SYSTEM/SOFTWARE REQUIREMENTS

Hardware

  • internet connection (for grabbing/installing packages/updates)
  • a working LAN network with a router/internet-box (gateway)
  • a music library on local disk or on an USB Hard Drive or a shared directory on your LAN network with all your music files, could be a PC with a shared folder or a NAS with SMB server activated (Windows/Mac file sharing server)
  • PC desktop/Laptop connected to the LAN (all commands are sent to the Raspberry PI from this PC using ssh)
  • a Raspberry PI 5 or Raspberry PI 4 or Odroid C4 or Intel NUC or Others
    The Raspberry PI 3B+ IS NOT RECOMMENDED, add an external powered USB 2.0 hub if you still want to build it with RPI3). For more info read the Raspberry PI benchmark of USB and Ethernet available here: https://magpi.raspberrypi.org/articles/raspberry-pi-4-specs-benchmarks

    The device must be connected to the LAN with Ethernet cable.
    IMPORTANT: WiFi and Bluetooth are NOT recommended and NOT supported in this server installation, a server must be hard wired to your router with an Ethernet cable

  • USB DAC connected to USB to the device (to the powered usb hub with rPI 3b+)
  • SDCARD, mini SSD or usb stick (8GB is enough)

Software

  • MPD music player software to control your audio server and browse your music library (included),
    myMPD to control your music library with an internet browser (included),
    DroidMyMPD for Android app to control your music library from your tablet or smartphone (free app available for download here),
    MALP is also recommended for Android, MaximumMPD can be used on iOS (untested)
  • putty.exe is required on Windows, terminal on others for the SSH session
  • tool for building SD CARD or USB bootable stick (Win32DiskImager or Rufus on Windows for example)

Optional Features

  • remote control management (including play/stop/go next/prev/random/load default playlist… )
  • real time EQ (ALSAEQ plugin)
  • DLNA (Upnp) Media server music player/server ( control audio from Upnp music player or listen music from upnp media server)
  • Spotify account (listen music from Spotify Connect)
  • Airplay device (listen music from Apple devices)
  • Squeezelite player (squeezelitebox for using with LMS player)
  • Roon system

Click the button NEXT below to continue…

MUSICLOUNGE AUDIO DISTRO TERMS AND CONDITIONS OF USE

TERMS AND CONDITIONS OF USES

LICENSE:
instructions bellow are under Creative Commons Attribution-NonCommercial-ShareAlike 4.0 International (CC BY-NC-SA 4.0)

Read the terms & conditions of uses here (English):
https://creativecommons.org/licenses/by-nc-sa/4.0/

DISCLAIMER:
Neither the author nor any of its providers of information shall have any liability for the accuracy of the information contained in the Service, or for delays or omissions therein. None of the foregoing parties shall be liable for any third-party claims or losses of any nature, including, but not limited to, lost profits, punitive or consequential damages.
The information provided within these pages is not guaranteed to be accurate, nor does the management take responsibility for it. The information comes from other sources and therefore may be wholly unreliable, and the management does not guarantee its suitability for any purpose.
Although the information contained herein may be completely useless, all rights are retained by their respective owners, including, but not limited to, the right of reproduction, the right of distribution, and the right of passage.
the author specifically disclaims any implied warranties or merchantability or fitness for any particular purpose and shall in no event be liable for any loss of profit or any other commercial damage, including but not limited to special, incidental, consequential, or other damages, even if advised of the possibility of such damages.

These instruction are subject to change without notice

by using these instructions below you fully understand and agree with the terms and conditions.

Click the button NEXT below to continue…