Add IR Remote Control


# STEP16

# OPTIONAL: Add A Remote Control Management
# this tutorial and the next one is about controlling the audio server with a remote control to play, pause, stop, go next / prev song, launch playlist, drive equalizer,…
# this one use a very easy to use tool named Triggerhappy and the other use Lirc a more complete implementation supporting hundreds remote controls
# IMPORTANT: some devices like Intel NUC needs to enable Enhanced Consumer IR in BIOS to work with remote control

# Add a remote control management

# install triggerhappy (should be already installed)

  1. $ sudo apt-get install triggerhappy

# create a configuration file
# pressing ZERO button select the default (first) audio output

  1. $ sudo nano /etc/triggerhappy/triggers.d/triggers.conf


# add your key to play, stop,… copy/paste the lines below:
# in addition to the standard play, stop, pause,… commands,
# this remote control config will
# start playing playlist 1 to 3 random order by pressing the corresponding key 1, 2 or 3
# select 2 EQ setup by pressing key 6 or 9
# select the default audio output (NO EQ) by pressing 0 (zero)
#

KEY_PLAY 0 mpc play >/dev/null
KEY_STOP 0 mpc stop >/dev/null
KEY_PAUSE 0 mpc toggle >/dev/null
KEY_PLAYPAUSE 0 mpc toggle >/dev/null 
KEY_NEXT 0 mpc next >/dev/null
KEY_PREVIOUS 0 mpc prev >/dev/null
KEY_FASTFORWARD 0 mpc seek +10 >/dev/null
KEY_REWIND 0 mpc seek -10 >/dev/null
KEY_RECORD 0 /home/pi/scripts/./playlist.sh >/dev/null
KEY_LEFTCTRL+KEY_P 0 mpc play >/dev/null
KEY_LEFTCTRL+KEY_S 0 mpc stop >/dev/null
BTN_MIDDLE 0 mpc toggle >/dev/null
BTN_LEFT 0 mpc prev >/dev/null
KEY_LEFTCTRL+KEY_B 0 mpc prev >/dev/null
KEY_LEFTCTRL+KEY_F 0 mpc next >/dev/null
KEY_HOME 0 mpc toggle >/dev/null
KEY_LEFTSHIFT+KEY_B 0 mpc seek -10 >/dev/null
KEY_LEFTSHIFT+KEY_F 0 mpc seek +10 >/dev/null
KEY_NUMERIC_1 0 /home/pi/scripts/./playlist1.sh >/dev/null 
KEY_NUMERIC_2 0 /home/pi/scripts/./playlist2.sh >/dev/null
KEY_NUMERIC_3 0 /home/pi/scripts/./playlist3.sh >/dev/null
KEY_NUMERIC_6 0 /home/pi/scripts/./lowbass.sh >/dev/null
KEY_NUMERIC_9 0 /home/pi/scripts/./jbleq.sh >/dev/null
KEY_NUMERIC_0 0 mpc enable only 1 && mpc play >/dev/null
KEY_0 0 mpc enable only 1 && mpc play >/dev/null
KEY_1 0 /home/pi/scripts/./playlist1.sh >/dev/null 
KEY_2 0 /home/pi/scripts/./playlist2.sh >/dev/null 
KEY_3 0 /home/pi/scripts/./playlist3.sh >/dev/null 
KEY_6 0 /home/pi/scripts/./lowbass.sh >/dev/null
KEY_9 0 /home/pi/scripts/./jbleq.sh >/dev/null

# CTRL+O to save
# CTRL+X to exit

# activate triggerhappy

  1. $ sudo systemctl enable triggerhappy


  1. $ sudo systemctl start triggerhappy


  1. $ sudo systemctl status triggerhappy


# DEBUG THE KEY CODES
# useful if your remote control is not working, skip this during install
# if your remote control do not send the correct key use the dump function to identify the correct key and change your cmds in triggers.conf
# To dump all events received through your remote control (useful to get the corresponding keys):

  1. $ sudo thd --dump /dev/input/event*
EV_KEY KEY_5 1 /dev/input/event4
# KEY_5 1 command
EV_KEY KEY_5 0 /dev/input/event4
# KEY_5 0 command
EV_KEY KEY_5 1 /dev/input/event4
# KEY_5 1 command
EV_KEY KEY_5 0 /dev/input/event4
# KEY_5 0 command
EV_KEY KEY_5 1 /dev/input/event4
# KEY_5 1 command
EV_KEY KEY_5 0 /dev/input/event4
# KEY_5 0 command


# CTRL+C to exit


# OPTIONAL
# if you need to run script as root from triggerhappy (default user is nobody) do the following:
# giving root access is risky but if know what you’re doing this can be useful to run script to set parametric EQ or load playlist with the remote
# useful to drive ALSAEQ (equalizer plugin) for example

  1. $ sudo nano /lib/systemd/system/triggerhappy.service

change
–user nobody
to
–user root

# CTRL+O to save
# CTRL+X to exit

  1. $ sudo nano /etc/default/triggerhappy


# comment

#DAEMON_OPTS=""

# uncomment

DAEMON_OPTS="--user root"

# CTRL+O to save
# CTRL+X to exit

  1. $ sudo systemctl daemon-reload


  1. $ sudo systemctl restart triggerhappy


  1. $ sudo systemctl status triggerhappy

# add a playlist script
# if you followed our tutorials the playlist/ and scripts/ directory are already created

# from a remote PC, open the share point playlists and copy 2 playlists into it
# for example my_classical_albums.m3u and my_jazzy_albums.m3u

# create the script

  1. $ sudo nano ~/scripts/playlist1.sh
#!/bin/bash
#
# Script to load playlist
 
echo "start playlist"
mpc stop
mpc clear
mpc enable only 1
mpc load my_classical_albums
mpc random "on"
mpc crossfade 0
mpc play

# CTRL+O to save
# CTRL+X to exit

# set exec permission

  1. $ sudo chmod +x ~/scripts/playlist1.sh

# create the script

  1. $ sudo nano ~/scripts/playlist2.sh
#!/bin/bash
#
# Script to load playlist
 
echo "start playlist"
mpc stop
mpc clear
mpc enable only 1
mpc load my_jazzy_albums
mpc random "on"
mpc crossfade 0
mpc play

# CTRL+O to save
# CTRL+X to exit

# set exec permission

  1. $ sudo chmod +x ~/scripts/playlist2.sh

# now pressing key 1 or 2 of the remote control plays the playlist classical or jazzy

# obviously for this to work you need to save your playlists in the playlists directory


# in our example of configuration above we have key 6 and 9 assigned to ALSA EQ,
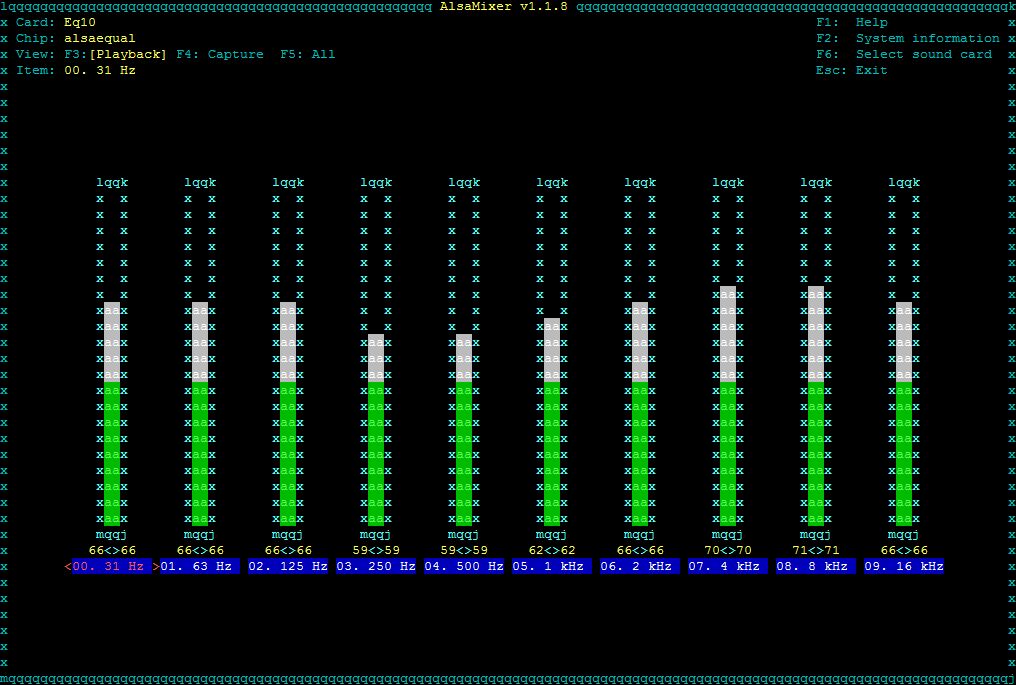
# by pressing key 6 or 9 you are going to trigger the lowbass.sh or the jbjeq.sh which drive the ALSA Equalizer plugin to shape your sound
read the tutorial on how to add a real time EQ to your audio system to complete the installation of this 2 scripts

# more info: triggerhappy by Stefan Tomanek <stefan.tomanek+th@wertarbyte.de>
http://github.com/wertarbyte/triggerhappy/

Click the button NEXT below to continue…

Alsa EQ Plugin


# ALSA EQ (alsaeq plugin)
# add a real-time adjustable equalizer plugin for ALSA sound server to your audiophile server

# install plugin

  1. $ sudo apt-get install libasound2-plugin-equal


# edit the .asoundrc (or create one if doesnt exist)

# mpd home

  1. $ sudo nano /var/lib/mpd/.asoundrc


pcm.!default {
type plug
slave.pcm plugequal;
}
ctl.!default {
type hw card 0
}
ctl.equal {
type equal;
}
pcm.plugequal {
type equal;
slave.pcm "plughw:1,0"; # NOTE this line MUST be your hardware device.
}
pcm.equal {
type plug;
slave.pcm plugequal;
}

# CTRL+O to save
# CTRL+X to exit

# OPTIONAL reboot

  1. $ sudo reboot


# command for using the mixer through MPD user:

  1. $ sudo -H -u mpd alsamixer -D equal

# user this command to EQ your audio system (if needed) and then
# write down the values of the 10 bands to create the corresponding EQ script
# then edit your remote control configuration to assign a key (see below for sample scripts)


# Sample script to drive the ALSA EQ

# 66 == zero change

# script to change preset:

seteq(){
sudo -H -u mpd amixer -D equal -q set '00. 31 Hz' $1
sudo -H -u mpd amixer -D equal -q set '01. 63 Hz' $2
sudo -H -u mpd amixer -D equal -q set '02. 125 Hz' $3
sudo -H -u mpd amixer -D equal -q set '03. 250 Hz' $4
sudo -H -u mpd amixer -D equal -q set '04. 500 Hz' $5
sudo -H -u mpd amixer -D equal -q set '05. 1 kHz' $6
sudo -H -u mpd amixer -D equal -q set '06. 2 kHz' $7
sudo -H -u mpd amixer -D equal -q set '07. 4 kHz' $8
sudo -H -u mpd amixer -D equal -q set '08. 8 kHz' $9
sudo -H -u mpd amixer -D equal -q set '09. 16 kHz' ${10}
}

# usage:

  1. $ seteq 29 39 58 58 60 66 66 66 66 66

# see the IR remote control tutorials to trigger script by pressing a button of your remote control

# by default in the installation of triggerhappy or Lirc we assigned key 6 and 9 of the remote control to trigger ALSA EQ script lowbass.sh and jbleq.sh and key 0 (zero) to reset to dafault audio output (EQ is not used in the default)

# if you followed the installation the scripts/ directory is already created

# we are going to create a simple script to drive the ALSA EQ
# the script start to select the “ALSA EQ” audio output of MPD
# then it sets each band of the EQ

  1. $ sudo nano ~/scripts/lowbass.sh
#!/bin/bash
mpc enable only 'ALSA EQ'
sudo -u mpd /usr/bin/amixer -D equal -q set '00. 31 Hz' 39
sudo -u mpd /usr/bin/amixer -D equal -q set '01. 63 Hz' 39
sudo -u mpd /usr/bin/amixer -D equal -q set '02. 125 Hz' 58
sudo -u mpd /usr/bin/amixer -D equal -q set '03. 250 Hz' 58
sudo -u mpd /usr/bin/amixer -D equal -q set '04. 500 Hz' 60
sudo -u mpd /usr/bin/amixer -D equal -q set '05. 1 kHz' 66
sudo -u mpd /usr/bin/amixer -D equal -q set '06. 2 kHz' 66
sudo -u mpd /usr/bin/amixer -D equal -q set '07. 4 kHz' 66
sudo -u mpd /usr/bin/amixer -D equal -q set '08. 8 kHz' 66
sudo -u mpd /usr/bin/amixer -D equal -q set '09. 16 kHz' 66
mpc play

# set exec permission

  1. $ sudo chmod +x ~/scripts/lowbass.sh

# reshaping JBL speakers example

  1. $ sudo nano ~/scripts/jbleq.sh
#!/bin/bash
mpc enable only 'ALSA EQ'
sudo -u mpd /usr/bin/amixer -D equal -q set '00. 31 Hz' 66
sudo -u mpd /usr/bin/amixer -D equal -q set '01. 63 Hz' 66
sudo -u mpd /usr/bin/amixer -D equal -q set '02. 125 Hz' 66
sudo -u mpd /usr/bin/amixer -D equal -q set '03. 250 Hz' 60
sudo -u mpd /usr/bin/amixer -D equal -q set '04. 500 Hz' 60
sudo -u mpd /usr/bin/amixer -D equal -q set '05. 1 kHz' 62
sudo -u mpd /usr/bin/amixer -D equal -q set '06. 2 kHz' 66
sudo -u mpd /usr/bin/amixer -D equal -q set '07. 4 kHz' 70
sudo -u mpd /usr/bin/amixer -D equal -q set '08. 8 kHz' 71
sudo -u mpd /usr/bin/amixer -D equal -q set '09. 16 kHz' 66
mpc play

# set exec permission

  1. $ sudo chmod +x ~/scripts/jbleq.sh

# set owner of scripts directory to current user (pi)

  1. $ sudo chown $USER:$USER  ~/scripts/*

# Congrats! Now you can shape your sound with EQ plugin (obviously not suitable for native DSD playback)
# see the next tutorial to install remote control and select on-fly your EQ setup by pressing key 6 or 9 of the remote control,
# key 0 (zero) reset to default audio output (no EQ)

myMPD WEB Client


# STEP15

# install myMPD WEB Client
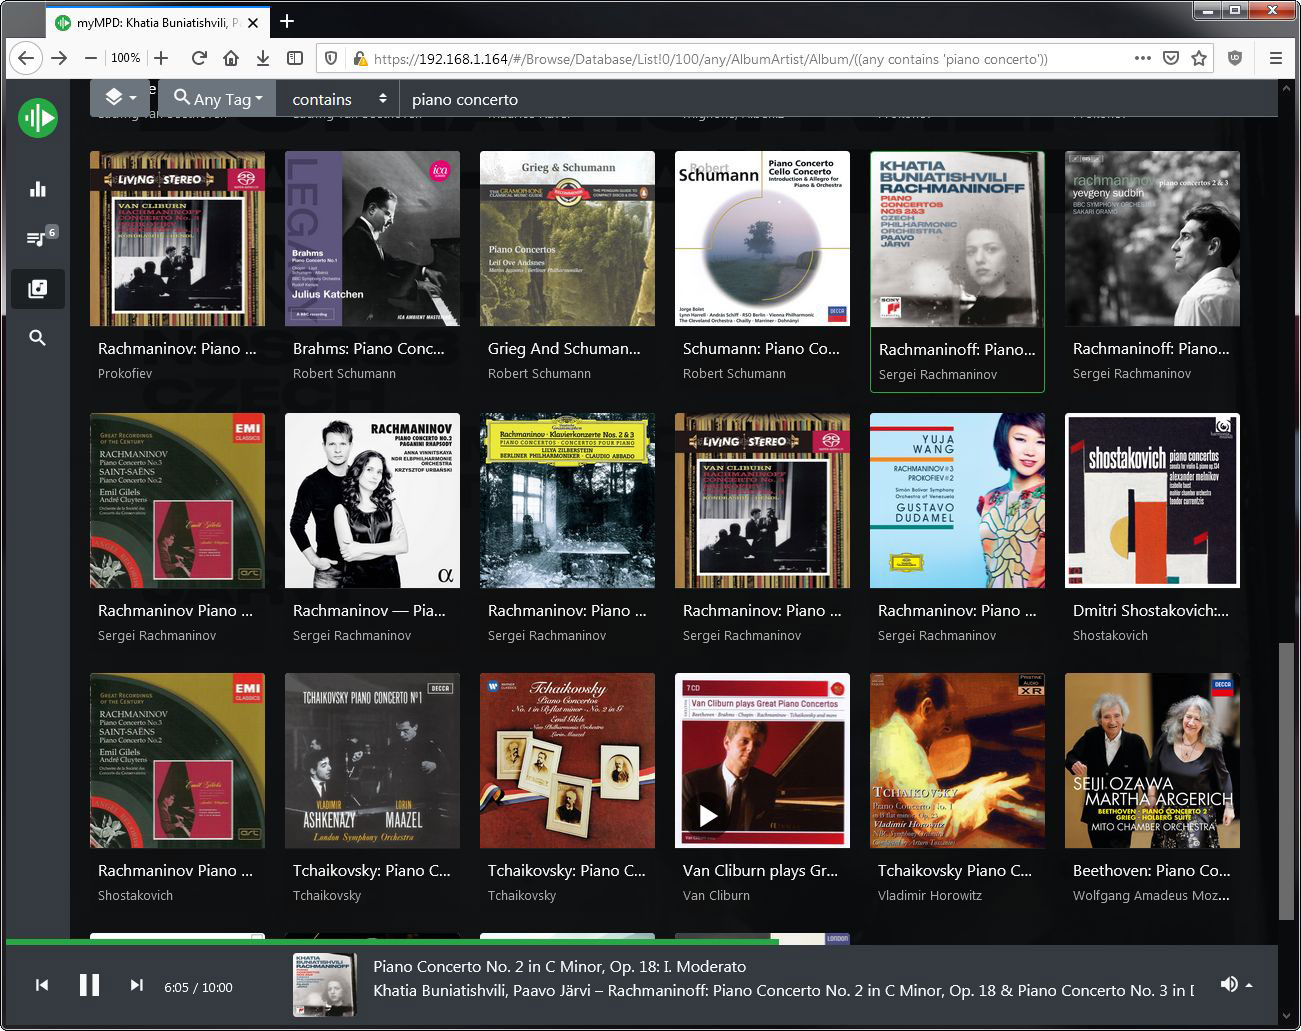
# use a simple Internet browser with your desktop PC, tablet or phone to play and browse your music library

# install dependencies, compile and install myMPD

  1. cd ~/Downloads/

# install git if the command is not found

  1. sudo apt install git
  1. $ sudo git clone https://github.com/jcorporation/myMPD.git
  2. $ cd myMPD
  3. $ sudo ./build.sh installdeps
  4. $ sudo ./build.sh release

# install

  1. $ sudo ./build.sh install

# configure mympd or update config (new version)
# /etc/mympd.conf is no longer used in recent version, check this link for more info:
# https://jcorporation.github.io/myMPD/configuration/

# to create initial configuration with new version using systemd:

  1. $ sudo systemd-run -t -p DynamicUser=yes -p StateDirectory=mympd -p CacheDirectory=mympd /usr/bin/mympd -c

# to create initial configuration with OLD version of myMPD:

  1. $ sudo mympd -c

# configure http port to 8080
# edit and replace 80 to 8080 and CTRL+X to save

  1. $  sudo nano /var/lib/mympd/config/http_port

# deactivate SSL
# replace true to false and CTRL+X to save

  1. $ sudo nano /var/lib/mympd/config/ssl

# almost all other configuration like deactivate home page
# or auto-generated playlist (AKA myMPD smart playlist)
# are available from mympd web client directly

# ==========================================================
# configure mympd (old version)
# ==========================================================

  1. $ sudo nano /etc/mympd.conf

# change httpport = 80 to

httpport = 8080

# deactivate SSL

ssl = false

# if you want to deactivate home page and auto-generated playlist (AKA myMPD smart playlist)
# add the following in the mympd section

smartpls = false
home = false

# CTRL+O to save
# CTRL+X to exit

# ==========================================================

# activate myMPD service

  1. $ sudo systemctl enable mympd
  2. $ sudo systemctl start mympd

# OPTIONAL reboot

  1. $ sudo reboot

# check the status

  1. $ sudo systemctl status mympd

# open your internet browser firefox or chromium or safari or other
# we already configure the web server nginx (see the corresponding page for more info)

# if ssl is activated, a warning about outdated or self-signed ssl certificate will be showing up nothing to worry about, the ssl cert is automatically generated by myMPD,

# to get access to your music library enter:
http://musiclounge/mympd/

# or enter the IP of your audio server followed by the port
http://192.168.XXX.XXX:8080

# Enjoy your music library from any remote device

# visit myMPD repository for more info:
https://github.com/jcorporation/myMPD

# ==========================================================

TROUBLESHOOTING

# if for some reason myMPD fails at startup, it’s almost certainly a permission issue
# due to an upgrade from old version to the recent version of myMPD

mympd.service: Failed to set up special execution directory in /var/cache: File exists


# the new version of myMPD no longer uses a static ‘mympd’ group/user but the
# DynamicUser feature of systemd which automatically attributes the correct user and group
# to all myMPD directories at startup

# to cleanup your installation do the following
# (all cache and configuration files will be deleted)

  1. $ sudo systemctl stop mympd
  2. $ sudo rm -Rf /var/lib/mympd
  3. $ sudo rm -Rf /var/lib/private/mympd
  4. $ sudo rm -Rf /var/cache/private/mympd
  5. $ sudo rm -Rf /var/cache/mympd
  6. $ sudo userdel mympd
  7. $ sudo groupdel mympd

# to create initial configuration with the new version using systemd:

  1. $ sudosystemd-run -t -p DynamicUser=yes -p StateDirectory=mympd -p CacheDirectory=mympd /usr/bin/mympd -c

# now the directories are re-created by myMPD and user/group assigned by systemd,
# configure http port to 8080
# edit and replace 80 to 8080 and CTRL+X to save

  1. $  sudo nano /var/lib/mympd/config/http_port

# deactivate SSL
# replace true to false and CTRL+X to save

  1. $ sudo nano /var/lib/mympd/config/ssl

# reboot

  1. $ sudo reboot

# start myMPD with the correct config and check the status.

  1. $ sudo systemctl start mympd

# if the album cover are not visible in database view, you may try to change the music directory to NONE

# Everything should be okay.

Update MPD Database


# STEP14

# Congrats! MPD is installed and running!

# First Steps With Music Player Daemon

# it’s now time to update the tag db of MPD, we are using the client this time (mpc):
# type the following cmds to update the MPD database

  1. $ mpc update

# check the status to see if the update is done type:

  1. $ mpc status

# “Updating DB …” shouldn’t be in the status result (can take a while be patient, 1500 albums/19000 songs is about 10mn to be updated)

# loop with

  1. $ mpc status

# until the DB is updated


# STEP15

  1. $ mpc status

# play songs to check if everything is OKAY! 😉

# follow instructions to install myMPD and open your internet browser and type the hostname (musiclounge/mympd) or IP address of your MusicLounge server to use myMPD Web Client

# http://musiclounge/mympd/
# or http://musiclounge:8080
# or http://192.168.x.x:8080

# or download our dedicated DroidMyMPD app for Android and start browsing your library and play your favorite song,

# Also, you can install a MPD client on your phone / tablet like MALP for Android ( https://gitlab.com/gateship-one/malp )
# select the correct ALSA audio output
# and to browse your library and enjoy your music!

Click the button NEXT below to continue with optional features like:

# – add a WEB Client to browse/play music from firefox, chrome, safari, edge, …
# – add IR remote control management
# – add DLNA (upnp) server/renderer
# – add Spotify connect
# – add Airplay renderer
# – Roon server/bridge
# – ALSA EQ

Browse your music library with MPD client

Samba Configuration


# STEP13

# share points (useful for browsing/updating server files from Windows or Mac ) add the lines below at the end of the smb configuration:
#
# also, add the home storage shared point
# if you want to get a full access to the sd card content from windows/mac
# (attention ‘root’ access here)
#

  1. $ sudo nano /etc/samba/smb.conf

# edit samba configuration by commenting [home] entries and adding the settings bellow at end (playlists, music and storage access)

[playlists]
path = /var/lib/mpd/playlists
read only = no
public = yes
writable = yes
browseable = yes
guest ok = yes
create mask = 0777
directory mask = 0755
force user = mpd

[music]
path = /mnt/media
read only = no
public = yes
writable = yes
browseable = yes
guest ok = yes
create mask = 0777
directory mask = 0755
force user = mpd

[www]
path = /var/www/html
read only = no
public = yes
writable = yes
browseable = yes
guest ok = yes
create mask = 0777
directory mask = 0755
force user = www-data

[Downloads]
path = /home/pi/Downloads
read only = no
public = yes
writable = yes
browseable = yes
guest ok = yes
create mask = 0777
directory mask = 0755
force user = pi

[scripts]
path = /home/pi/scripts
read only = no
public = yes
writable = yes
browseable = yes
guest ok = yes
create mask = 0777
directory mask = 0755
force user = pi

[sdcard]
path = /home/pi
read only = no
public = yes
writable = yes
browseable = yes
guest ok = yes
create mask = 0777
directory mask = 0755
force user = root


# CTRL+O to save
# CTRL+X to exit

# restart samba:

  1. $ sudo /etc/init.d/smbd restart

# or

  1. $ sudo systemctl restart smbd


# wait 5 sec and type the cmd below if shared points are NOT visible from your Windows network browser:

  1. $ sudo systemctl restart nmbd

# now install WS Discovery service to view linux machine from Windows Explorer Network.

  1. $ sudo apt install wsdd

# check the status of the service

  1. $ sudo systemctl status wsdd

# the music contains the songs files and playlists directory is empty but visible using the Windows network browser on your PC

# OPTIONAL: reboot your device

  1. $ sudo reboot

# IMPORTANT: it’s recommended to remove the [sdcard] shared point from smb.conf as soon as your installation is working correctly.

Click the button NEXT below to continue…

Activate MPD


# STEP11

# activate service

  1. $ sudo systemctl enable mpd


# restart MPD

  1. $ sudo systemctl start mpd


# if you have an error in your conf file and MPD didn't start type the following to get the error line:

  1. $ sudo systemctl status mpd


# loop step 10/11 to fix mpd.conf until MPD start correctly without error (see previous step)


# STEP12

# create playlists directory if not exists

  1. $ ls -l /var/lib/mpd/
pi@musiclounge:~$ ls -l /var/lib/mpd/
total 28
drwxr-xr-x 2 root root   4096 Feb 25  2019 music
drwxr-xr-x 2 mpd  audio  4096 Feb 25  2019 playlists
-rw-r--r-- 1 mpd  audio   189 Jun 18 04:37 state
-rw-r--r-- 1 mpd  audio 12288 Jun 18 04:29 sticker.sql
-rw-r--r-- 1 mpd  audio   241 Jun 18 04:41 tag_cache

# SKIP THIS STEP if playlists directory exists (should be already created by MPD installation)

# if the directory does not exist, create it

  1. $ sudo mkdir /var/lib/mpd/playlists


# change user:group if not mpd:audio

  1. $ sudo chown mpd:audio /var/lib/mpd/playlists


# set permission if not already 755

  1. $ sudo chmod 755 /var/lib/mpd/playlists


Click the button NEXT below to continue...

Configure MPD


# STEP10

# YOUR USB DAC MUST BE CONNECTED TO THE USB PORT AND READY

# edit the configuration of MPD with a DAC USB connected but before:

# identify your USB DAC ID (usually card 1):

  1. $ aplay -l

# in case of *No Soundcard Error*, read our tutorial to install ALSA correctly and prepare your Linux distribution

# to list of playback hardware devices (card 0, card 1, car 2….) and to get the index of your USB DAC

# report this index number in the line device “hw:x,0” of all audio output in mpd.conf see below

# the USB DAC should be indexed 1 or 2

# BEWARE if you disable the RASPBERRY PI HDMI port later (see the corresponding howto) the ID of your DAC will certainly change which require to modify mpd.conf audio output as well


# If your sound card order changes on boot, you can “play” with /etc/modprobe.d/alsa-base.conf to specify its order. For example, if you want your snd_usb_audio (USB DAC) card to be #1:

options snd_usb_audio index=1

You can also provide an index of -2 to instruct ALSA to never use a card as the primary one and ensure USB DAC never getting index 0:

options snd_usb_audio index=-2

This will change the order of the devices in the list (read the ALSA doc online to get more info on alsa-base.conf).

# check the card IDs after reboot with

  1. $ aplay -l
**** List of PLAYBACK Hardware Devices ****
card 0: Headphones [bcm2835 Headphones], device 0: bcm2835 Headphones [bcm2835 Headphones]
  Subdevices: 8/8
  Subdevice #0: subdevice #0
  Subdevice #1: subdevice #1
  Subdevice #2: subdevice #2
  Subdevice #3: subdevice #3
  Subdevice #4: subdevice #4
  Subdevice #5: subdevice #5
  Subdevice #6: subdevice #6
  Subdevice #7: subdevice #7
card 1: MQA [D90 MQA], device 0: USB Audio [USB Audio]
  Subdevices: 1/1
  Subdevice #0: subdevice #0
card 2: vc4hdmi0 [vc4-hdmi-0], device 0: MAI PCM i2s-hifi-0 [MAI PCM i2s-hifi-0]
  Subdevices: 1/1
  Subdevice #0: subdevice #0
card 3: vc4hdmi1 [vc4-hdmi-1], device 0: MAI PCM i2s-hifi-0 [MAI PCM i2s-hifi-0]
  Subdevices: 1/1
  Subdevice #0: subdevice #0

# also to get the name of the driver list the sound modules with:

  1. $ cat /proc/asound/modules
 0 snd_bcm2835
 1 snd_usb_audio
 2 vc4
 3 vc4

# example of configuration for the raspberry PI 5 or PI 4, edit the alsa-base.conf

  1. $ sudo nano /etc/modprobe.d/alsa-base.conf
options snd_usb_audio index=-2

# on raspberry PI 5 and PI 4 with latest bookworm OS disable HDMI (vc4 kms driver) to be sure to get the card id 1 for your USB DAC.
# edit the config.txt and reboot
# comment: camera_auto_detect=1, dtoverlay=vc4-kms-v3d and max_framebuffers=2
#
and set display_auto_detect=0 see below

  1. $ sudo nano /boot/firmware/config.txt
# Enable audio (loads snd_bcm2835)
dtparam=audio=on

# Additional overlays and parameters are documented
# /boot/firmware/overlays/README

# Automatically load overlays for detected cameras
#camera_auto_detect=1

# Automatically load overlays for detected DSI displays
display_auto_detect=0

# Automatically load initramfs files, if found
auto_initramfs=1

# Enable DRM VC4 V3D driver
#dtoverlay=vc4-kms-v3d
#max_framebuffers=2

# then check with aplay -l

$ aplay -l
**** List of PLAYBACK Hardware Devices ****
card 0: Headphones [bcm2835 Headphones], device 0: bcm2835 Headphones [bcm2835 Headphones]
Subdevices: 8/8
Subdevice #0: subdevice #0
Subdevice #1: subdevice #1
Subdevice #2: subdevice #2
Subdevice #3: subdevice #3
Subdevice #4: subdevice #4
Subdevice #5: subdevice #5
Subdevice #6: subdevice #6
Subdevice #7: subdevice #7
card 1: MQA [D90 MQA], device 0: USB Audio [USB Audio]
Subdevices: 1/1
Subdevice #0: subdevice #0

# reboot

  1. $ sudo reboot

# backup default MPD config mpd.conf into our Downloads/ directory

  1. $ sudo cp /etc/mpd.conf ~/Downloads/mpd.conf

# erase the current config and replace with the settings below

  1. $ sudo truncate -s 0 /etc/mpd.conf
  1. $ sudo nano /etc/mpd.conf

# replace with the settings below

# nano shortcut: CTRL + K to cut an entire line
# this settings use USB DAC on card 1 (hw:1,0), change the index accordingly if needed

# copy the lines below and right-click on nano editor to paste
#

music_directory "/mnt/media"
playlist_directory "/var/lib/mpd/playlists"
db_file "/var/lib/mpd/tag_cache"
log_file "/var/log/mpd/mpd.log"
# uncomment pid_file if you do not use systemd 
#pid_file "/run/mpd/pid"
state_file "/var/lib/mpd/state"
sticker_file "/var/lib/mpd/sticker.sql"
user "mpd"
group "audio"
bind_to_address "any"
port "6600"
log_level "default"
restore_paused "yes"
#save_absolute_paths_in_playlists "no"
#metadata_to_use "artist,album,title,track,name,genre,date,composer,performer,disc"
#metadata_to_use "+comment"
auto_update "no"
#auto_update_depth "3"
follow_outside_symlinks "yes"
follow_inside_symlinks "yes"
zeroconf_enabled "no"
zeroconf_name "Music DAC"
connection_timeout "120"
#password "password@read,add,control,admin"
#default_permissions "read,add,control,admin"
#
###############################################################################

# Database #######################################################################
#

#database {
# plugin "proxy"
# host "other.mpd.host"
# port "6600"
#}

# Input #######################################################################
#

input {
plugin "curl"
# proxy "proxy.isp.com:8080"
# proxy_user "user"
# proxy_password "password"
}

# QOBUZ input plugin
input {
enabled "no"
plugin "qobuz"
# app_id "ID"
# app_secret "SECRET"
# username "USERNAME"
# password "PASSWORD"
# format_id "N"
}

# TIDAL input plugin
input {
enabled "no"
plugin "tidal"
# token "TOKEN"
# username "USERNAME"
# password "PASSWORD"
# audioquality "Q"
}

# Decoder #####################################################################
#

decoder {
plugin "ffmpeg"
enabled "yes"
# gapless "no"
}

decoder {
plugin "wildmidi"
enabled "no"
}

replaygain "off"
replaygain_preamp "0"
#replaygain_missing_preamp "0"
#replaygain_limit "yes"
volume_normalization "no"
filesystem_charset "UTF-8"

###############################################################################

audio_output {
type "alsa"
name "Default"
device "hw:1,0"
mixer_type "none"
dop "no"
}

audio_output {
type "alsa"
name "ALSA DAC DOP"
device "hw:1,0"
mixer_type "none"
dop "yes"
}

audio_output {
type "alsa"
name "ALSA DAC NoDOP"
device "hw:1,0"
mixer_type "none"
dop "no"
}

audio_buffer_size "4096"
#buffer_before_play "10%"
max_output_buffer_size "131072"
max_connections "128"

audio_output {
type "alsa"
name "ALSA EQ"
device "plug:plugequal"
# format "44100:16:2" # optional
# mixer_device "default" # optional
# mixer_control "PCM" # optional
# mixer_index "0" # optional
}
# optional output to stream music using vorbis encoder to local device (phone, tablet, pc,...)
audio_output {
type            "httpd"
name            "Local Stream"
encoder         "vorbis"
#encoder        "lame"         # comment vorbis and use lame for iOS support
port            "8000"
quality         "5.0"           # do not define if bitrate is defined
#bitrate        "128"           # do not define if quality is defined
#format          "44100:16:1"
always_on       "yes"           # prevent MPD from disconnecting all listeners when playback
tags            "yes"           # httpd supports sending tags to listening streams.
}

# to get an high res stream from your MPD server change quality from “5.0” to “10.0”
# beware high quality stream needs a high speed WIFI/network to work smoothly

# optional output to stream music using MP3 encoder to local device (phone, tablet, pc,...)
audio_output {
type            "httpd"
name            "Local Stream MP3"
encoder         "lame"
#encoder        "lame"         # comment vorbis and use lame for iOS support
port            "8000"
quality         "0"           # do not define if bitrate is defined
#bitrate        "128"           # do not define if quality is defined
format          "44100:16:2"
always_on       "yes"           # prevent MPD from disconnecting all listeners when playback
tags            "yes"           # httpd supports sending tags to listening streams.
}

# to get an high quality MP3 stream from your MPD server
# set the quality for VBR from “0” the highest quality to “9” the lowest quality.
# beware high quality stream needs a high speed WIFI/network to work smoothly

# CTRL+O to save
# CTRL+X to exit

# to get the stream, select “Local Stream” or “Local Stream MP3” audio output in myMPD or any MPD client
# then open VLC app for example and type the address http://musiclounge:8000 in Open Network Stream and play.

# OPTIONAL: You can skip this step if a server distribution is installed
# but for desktop distro you have to disable MPD user service
# because you run it as a headless server:

  1. $ sudo rm /etc/xdg/autostart/mpd.desktop
  2. $ sudo systemctl --global disable mpd.service
  3. $ sudo systemctl --global disable mpd.socket

# MPD server is now configured.
# Click NEXT button to activate Music Player Daemon


# TROUBLESHOUTING

# if the error is releated to audio device not found, read again the first chapter of this tutorial to configure modprobe correctly and ensure your USB DAC card ID is 1 or edit all your configuration including MPD to change the plugin hardware id (“plughw:X,0”)

# in case of error (generally occurs within 5s just after playing):

alsa_output: Decoder is too slow; playing silence to avoid xrun

# adding the following lines to all your audio output in mpd configuration (/etc/mpd.conf) may help
#

buffer_time "200000"
period_time "5084"

#
# edit mpd.conf and scroll to audio output area to add the 2 lines

  1. $ sudo nano /etc/mpd.conf
.
.
.
audio_output {
type "alsa"
name "Default"
device "hw:1,0"
mixer_type "none"
dop "no"
buffer_time "200000"
period_time "5084"
}

audio_output {
type "alsa"
name "ALSA DAC DOP"
device "hw:1,0"
mixer_type "none"
dop "yes"
buffer_time "200000"
period_time "5084"
}
.
.
.

#
# in case of non fatal binding error

server_socket: bind to '0.0.0.0:8000' failed (continuing anyway, because binding to '[::]:8000' succeeded): Failed to bind socket: Address already in use

# a binding already exists due to ipv6, however mpd is running correctly. if you do not need ipv6 support follow these instructions to disable it by using sysctl command and by adding the kernel option ipv6.disable=1 https://www.wikihow.com/Disable-Ipv6-on-Linux


Control The Volume Good or Bad? - Read More...

# keep a Bit Perfect audio with a control of the volume, possible?
# yes, this is possible but only if this is supported by your USB DAC and only with PCM

# check if hardware volume is supported
# get the card number of your USB DAC
# (should be 1 if you only have 1 DAC connected)

  1. $ aplay -l
pi@musiclounge:~$ aplay -l
**** List of PLAYBACK Hardware Devices ****
card 0: S9Pro [Hidizs S9Pro], device 0: USB Audio [USB Audio]
  Subdevices: 0/1
  Subdevice #0: subdevice #0
card 1: MQA [D90 MQA], device 0: USB Audio [USB Audio]
  Subdevices: 1/1
  Subdevice #0: subdevice #0
card 2: SM1ODROIDC4 [SM1-ODROID-C4], device 0: fe.dai-link-0 (*) []
  Subdevices: 1/1
  Subdevice #0: subdevice #0
card 2: SM1ODROIDC4 [SM1-ODROID-C4], device 1: fe.dai-link-1 (*) []
  Subdevices: 1/1
  Subdevice #0: subdevice #0
card 2: SM1ODROIDC4 [SM1-ODROID-C4], device 2: fe.dai-link-2 (*) []
  Subdevices: 1/1
  Subdevice #0: subdevice #0

# in this example we have 2 DAC connected
# list mixer contents of the device 1

  1. $ amixer --card 1 scontents
 
pi@musiclounge:~$ amixer --card 1
pi@musiclounge:~$

# nothing for the topping D90

# now for the S9 Pro

  1. $ amixer --card 0 scontents
pi@musiclounge:~$ amixer --card 0
Simple mixer control 'PCM',0
  Capabilities: pvolume pswitch pswitch-joined
  Playback channels: Front Left - Front Right
  Limits: Playback 0 - 127
  Mono:
  Front Left: Playback 127 [100%] [0.00dB] [on]
  Front Right: Playback 127 [100%] [0.00dB] [on]
Simple mixer control 'PCM',1
  Capabilities: pvolume pvolume-joined
  Playback channels: Mono
  Limits: Playback 0 - 127
  Mono: Playback 87 [69%] [-20.00dB]

# great! the hardware volume is supported on this DAC
# now we change the mpd.conf to add this dac with hardware volume control

  1. $ sudo nano /etc/mpd.conf

# add this at the end of your configuration
# hw:0 must changed to corresponding card number of your DAC

audio_output {
type "alsa"
name "Hidizs S9 Pro Mixer ON"
device "hw:0,0"
mixer_type "hardware"
mixer_control "PCM"
mixer_index "0"
dop "no"
}

# another example with Topping D50 III DAC on card id 1

audio_output {
type "alsa"
name "Topping D50 III VOL ID1"
device "hw:1,0"
mixer_device "hw:1"
mixer_type "hardware"
mixer_control "D50\ III"
mixer_index "1"
dop "no"
}

# CTRL+O to save
# CTRL+X to exit

# that’s it!

# Our recommendation is to avoid using volume control in MPD configuration if
# a physical or integrated volume control is already included with your DAC

# in case you have no support of hardware mixer (volume) in your DAC capabilities
# but still want a “software” control of the volume here is the audio output to add to mpd.conf
# this is obviously not recommended

audio_output {
type "alsa"
name "ALSA Software Volume"
device "hw:1,0"
mixer_type "software"
dop "no"
}


Click the button NEXT below to continue…

Music Player Daemon (MPD) Server


# STEP9

# install MPD (server)and MPC (music player)
# Music Player Daemon (MPD) Info:
# https://www.musicpd.org/

# create a simbolic link for backward compatibility with old version of MPD # which target by default the configuration file in /usr/local/etc/mpd.conf

  1. $ ls /usr/local/etc


# result should be empty or not found then type

  1. $ sudo rm -r /usr/local/etc


  1. $ sudo ln -s /etc /usr/local/


# type again and result should show the files of etc/ directory

  1. $ ls /usr/local/etc

# optional pkg update

  1. $ sudo apt update

# install MPD

  1. $ sudo apt install mpd mpc -y

# Check mpd version

  1. $ mpd -V

# should be 0.21.22 or greater
# if the version is lower then compile and install mpd
# ( version 0.23.15 works really well with Raspberry PI 5 and PI 4 and Odroid C4, latest version works with barbone PC as well )

# our recommendation is to start with the super stable 0.23.12 and later give the latest version of MPD a try.

# you decide, you have the full info here to compile and install MPD, this is one of the benefit to get a full control of your audio server.

Click NEXT button below to skip the compilation of MPD …


COMPILE AND INSTALL NEW MPD 0.24+ - Click To Read More...

# check your gcc version:

  1. $ gcc --version

# if command not found install build-essential package

  1. $ sudo apt -y install build-essential

# skip the gcc install if version is 12.x+ or greater

  1. $ sudo apt install gcc-12-base

# FOR RASPBERRY PI OWNERS:

# on compilation error increase swap file size,
# change default 100 to 1024

  1. $ sudo nano /etc/dphys-swapfile

CONF_SWAPSIZE=1024

# reboot if you change the swap size

  1. $ sudo reboot

# get url archive from https://www.musicpd.org/download.html
# download latest archive mpd-0.24.x.tar.xz into your home directory (Downloads/ for example)
https://www.musicpd.org/download/mpd/0.2X/mpd-0.24.XX.tar.xz

# be sure to select your /Downloads folder inside your home directory (create the folder Downloads if needed)

  1. cd ~/Downloads

# hyper stable MPD release

  1. $ sudo wget https://www.musicpd.org/download/mpd/0.24/mpd-0.24.4.tar.xz

# extract (replace -version by the version of mpd mpd-0.24.4.tar.xz):

  1. $ sudo tar xf mpd-version.tar.xz

# enter directory:

  1. $ cd mpd-0.24.4

# or get the very latest (unstable dev release) by cloning the MPD git to MPD/

# install git if not found

  1. $ sudo apt install git
  1.  $ sudo git clone https://github.com/MusicPlayerDaemon/MPD.git
  1. $ cd MPD

# install dependencies:

In any case, you need: a C++20 compiler (e.g. GCC 12 or clang 14) Meson 1.0 and Ninja latest pkg-config

  1. $ sudo apt-get install ninja-build

# the command below must includes a lot of dev libraries
# be careful to double check it before validation with enter key
#

$ sudo apt install meson g++ pkgconf \
  libfmt-dev \
  libpcre2-dev \
  libmad0-dev libmpg123-dev libid3tag0-dev \
  libflac-dev libvorbis-dev libopus-dev libogg-dev \
  libadplug-dev libaudiofile-dev libsndfile1-dev libfaad-dev \
  libfluidsynth-dev libgme-dev libmikmod-dev libmodplug-dev \
  libmpcdec-dev libwavpack-dev libwildmidi-dev \
  libsidplay2-dev libsidutils-dev libresid-builder-dev \
  libavcodec-dev libavformat-dev \
  libmp3lame-dev libtwolame-dev libshine-dev \
  libsamplerate0-dev libsoxr-dev \
  libbz2-dev libcdio-paranoia-dev libiso9660-dev libmms-dev \
  libzzip-dev \
  libcurl4-gnutls-dev libexpat1-dev \
  nlohmann-json3-dev \
  libasound2-dev libao-dev libjack-jackd2-dev libopenal-dev \
  libpulse-dev libshout3-dev \
  libsndio-dev \
  libmpdclient-dev \
  libnfs-dev \
  libupnp-dev \
  libavahi-client-dev \
  libsqlite3-dev \
  libsystemd-dev \
  libgtest-dev \
  libicu-dev \
  libchromaprint-dev \
  libgcrypt20-dev \
  libsystemd-dev \
  libpipewire-0.3-dev

# reboot maybe required here # check meson version (1.0 minimum)

  1. $ meson -v

# configure:

  1. $ sudo meson . output/release --buildtype=debugoptimized -Db_ndebug=true -Dsysconfdir=/etc

# check configuration:

  1. $ sudo meson configure output/release

# compile (could take a while… ):

  1. $ sudo ninja -C output/release

# install:

# stop mpd in case it’s running

  1. $ sudo systemctl stop mpd
  1. $ sudo ninja -C output/release install

# go to home directory

  1. $ cd ~/

# Congrats! MPD is compiled and installed


COMPILE AND INSTALL OLD MPD - Click To Read More...

# check your gcc version:

  1. $ gcc --version

# if command not found install build-essential package

  1. $ sudo apt -y install build-essential

# skip the gcc install if version is 8.x+ or greater

  1. $ sudo apt install gcc-8-base

# FOR RASPBERRY PI OWNERS:

# on compilation error increase swap file size,
# change default 100 to 1024

  1. $ sudo nano /etc/dphys-swapfile

CONF_SWAPSIZE=1024

# reboot if you change the swap size

  1. $ sudo reboot

# get url archive from https://www.musicpd.org/download.html
# download latest archive mpd-0.23.x.tar.xz into your home directory (Downloads/ for example)
https://www.musicpd.org/download/mpd/0.2X/mpd-0.2X.XX.tar.xz

# be sure to select your /Downloads folder inside your home directory (create the folder Downloads if needed)

  1. cd ~/Downloads

# hyper stable MPD release

  1. $ sudo wget https://www.musicpd.org/download/mpd/0.23/mpd-0.23.12.tar.xz

# extract (replace -version by the version of mpd mpd-0.23.12.tar.xz):

  1. $ sudo tar xf mpd-version.tar.xz

# enter directory:

  1. $ cd mpd-0.23.12

# or get the very latest (unstable dev release) by cloning the MPD git to MPD/

# install git if not found

  1. $ sudo apt install git
  1.  $ sudo git clone https://github.com/MusicPlayerDaemon/MPD.git
  1. $ cd MPD

# install dependencies:

In any case, you need: a C++17 compiler (e.g. GCC 8 or clang 5) Meson 0.49.0 and Ninja Boost 1.58 pkg-config

  1. $ sudo apt-get install ninja-build

# the command below must includes a lot of dev libraries
# be careful to double check it before validation with enter key
#

$ sudo apt install meson g++ \
libfmt-dev \
libpcre2-dev \
libmad0-dev libmpg123-dev libid3tag0-dev \
libflac-dev libvorbis-dev libopus-dev libogg-dev \
libadplug-dev libaudiofile-dev libsndfile1-dev libfaad-dev \
libfluidsynth-dev libgme-dev libmikmod-dev libmodplug-dev \
libmpcdec-dev libwavpack-dev libwildmidi-dev \
libsidplay2-dev libsidutils-dev libresid-builder-dev \
libavcodec-dev libavformat-dev \
libmp3lame-dev libtwolame-dev libshine-dev \
libsamplerate0-dev libsoxr-dev \
libbz2-dev libcdio-paranoia-dev libiso9660-dev libmms-dev \
libzzip-dev \
libcurl4-gnutls-dev libyajl-dev libexpat-dev \
libasound2-dev libao-dev libjack-jackd2-dev libopenal-dev \
libpulse-dev libshout3-dev \
libsndio-dev \
libmpdclient-dev \
libnfs-dev \
libupnp-dev \
libavahi-client-dev \
libsqlite3-dev \
libsystemd-dev \
libgtest-dev \
libboost-dev \
libicu-dev \
libchromaprint-dev \
libgcrypt20-dev

# reboot maybe required here # check meson version (0.49 minimum)

  1. $ meson -v

# configure:

  1. $ sudo meson . output/release --buildtype=debugoptimized -Db_ndebug=true -Dsysconfdir=/etc

# check configuration:

  1. $ sudo meson configure output/release

# compile (could take a while… ):

  1. $ sudo ninja -C output/release

# install:

# stop mpd in case it’s running

  1. $ sudo systemctl stop mpd
  1. $ sudo ninja -C output/release install

# go to home directory

  1. $ cd ~/

# Congrats! MPD is compiled and installed


# if you just upgraded your mpd installation, you’re done, simply reboot
# if this is your first install click the button NEXT below to continue the installation…

  1. $ sudo reboot

Local Music Library Or USB Hard Drive

# using a local music library is very easy, simply add all your music inside /mnt/media, this folder is shared on the local network and is also available from host \\MUSICLOUNGE\music (read the SAMBA configuration for more info)

# using an external USB hard drive for your music library is also easy but the disk must be powered (even an SSD) with an external adapter.

# so make sure the usb hard drive is powered with an external adapter and plug the usb cable on the server board (rPI 4 or C4 or Pc),

Install exFAT File System

# exFAT file system is not installed by default on all distributions and you may need it
# to install exFAT do the following:

  1. $ sudo apt-get install exfat-fuse
  2. $ sudo apt-get install exfat-utils
  3. $ sudo reboot

Configuration

# start to list disks attached to find where is located

  1. $ sudo fdisk -l
Device Boot Start End Sectors Size Id Type
/dev/sda1 63 1953520064 1953520002 931.5G 7 HPFS/NTFS/exFAT

# /dev/sda1 is our usb hard drive location


# now get its UUID and file system

  1. $ sudo blkid
/dev/sda1: LABEL="SAMSGBKUP" UUID="9A2B-8FC2" TYPE="exfat" PARTUUID="5b0a6a10-01"

# here we have 9A2B-8FC2 as UUID and exfat file system

Auto-Mounting Drive

# normally if the MusicLounge audiophile server is correctly installed the /mnt/media directory is already there, check this:

  1. $ ls /mnt/media

# creates the directory if needed:

  1. $ sudo mkdir /mnt/media

# edit fstab to mount the disk at startup

  1. $ sudo nano /etc/fstab

# add this line WITH YOUR UUID and correct file system

# comment with # prefix any other line with /mnt/media)

UUID=9A2B-8FC2 /mnt/media exfat defaults,auto,umask=000,users,rw 0 0

# CTRL + X and Y to save

# before rebooting it’s important to test your fstab configuration

  1. $ sudo mount -a

# edit and check fstab configuration again if the command return an error

# reboot

  1. $ sudo reboot

# check your music library

  1. $ ls /mnt/media

Update MPD Database

# to update database use your favorite MPD client (MALP or DroidMyMPD or myMPD on your web browser) or open SSH session and type:

  1. $ mpc update

# that’s it!
# your music library is now on local disk

Tips

# to mount an exFat hard dive manually

  1. $ sudo mount -t exfat /dev/sda1 /mnt/media

# to unmount

  1. $ sudo umount -f /mnt/media

NGINX WEB Server


# STEP8

# install lightweight web server (nginx) to:
# get access to covers (album artwork) from MPD client
# use a internet browser with MPD WEB Client MyMPD on your desktop PC, tablet or phone to play and browse your music library

# Install the web server and dependencies:

  1. $ sudo apt-get install nginx php-curl php-sqlite3 php-gd php-json php-xml php-mbstring php-fpm php-intl imagemagick

# Edit configuration:

  1. $ sudo nano /etc/nginx/nginx.conf

# add this lines under gzip section

 gzip on;
 gzip_vary on;
 gzip_buffers 16 8k;
 gzip_comp_level 6;
 gzip_min_length 1000;
 gzip_proxied expired no-cache no-store private auth;
 gzip_types text/plain text/css application/json application/x-javascript text/xml application/xml application/xml+rss text/javascript application/vnd.ms-fontobject application/x-font-ttf font/opentype image/svg+xml image/x-icon;
 gzip_disable msie6;
 gzip_http_version 1.1;

# CTRL+O to save
# CTRL+X to exit


# Add an alias to get access to album cover (artwork) from http://192.168.x.x/music/…cover.jpg:
# add a redirection to myMPD (MPD WEB Client)
# Edit the default configuration and to write new server configuration below :

  1. $ sudo nano /etc/nginx/sites-available/default

# php is enabled (see the equalizer UI doc)
# and IPv6 is disabled by default on your LAN (the line listen [::]:80 default_server; is commented)
# BEWARE: php version 8.2 is installed by default in edition 2024 (bookworm),
# if Debian buster is installed and you didn’t update php change the fastcgi_pass line to your php version 7.x
# example for version 7.4: fastcgi_pass unix:/var/run/php/php7.4-fpm.sock;

	
server {
        listen 80 default_server;
#       listen [::]:80 default_server;

        root /var/www/html;

        # Add index.php to the list if you are using PHP
        index index.html index.htm index.php;

        server_name _;

        location /favicon.ico {
                alias /var/www/html/ml_play.png;
        }

        location /music {
                alias /mnt/media;
        }

        location /mympd/ {
                return 301 http://$host:8080/;
        }

        location /eq/ {
                return 301 http://$host:80/;
        }

        location ~* \.(css|js|jpg|jpeg|png|gif|ico|svg)$ {
                try_files $uri $uri/ =404;
        }

        location ~ \.php$ {
                include snippets/fastcgi-php.conf;
                fastcgi_pass unix:/var/run/php/php8.2-fpm.sock;
        }

        location / {
                try_files $uri $uri/ /index.php?$query_string;
        }
}

# CTRL+O to save
# CTRL+X to exit

# OPTIONAL
# create temp directory to save settings

  1. $ sudo mkdir /var/www/html/tmp

# add the user pi (your username) to group www-data

  1. $ sudo usermod -a -G www-data pi

# set permission

  1. $ sudo chown -R www-data:www-data /var/www
  2. $ sudo chmod -R g+rwX /var/www

# create a soft link of the web directory
# to get access to it from your home

  1. ln -s /var/www/ ~/www

# restart service

  1. $ sudo systemctl restart nginx


  1. $ sudo systemctl status nginx

# optional: reboot

  1. sudo reboot

# that’s it!


# now you can get access to your album covers from http

# type this address in your browser (replace with IP of the server and path to music that contains folder.jpg or cover.jpg )
# http://192.168.XX.XX/music/<song_path>/cover.jpg

# ATTENTION: you have to enter the IP of MusicLounge Audiophile Server and NOT the ip of your Music library share point
# http://192.168.1.xxx/music is now the link to get access to your musics from any music players whatever the platform (Android, iOS, Windows, Linux, …)

# FOR EXAMPLE

http://192.168.1.xxx/music/Bach/Toccata/cover.jpg


# start a new SSH session, it’s time to install the main part of this audiophile server – Music Player Daemon (AKA MPD)

Click the button NEXT below to continue…