![]()
GETTING STARTED WITH MUSICLOUNGE AUDIOPHILE DISTRO
IMPORTANT:
Linux Kernel v4.19.64 or greater is needed to play native DSD, check the kernel version of your Linux distro before building our audiophile server.

ODROID C4 BOARD
# for Odroid C4 take the Armbian distro preferably as the Official Hardkernel Ubuntu distro is outdated.
https://www.armbian.com/odroid-c4/#kernels-archive-all


RASPBERRY PI 5 or PI 4
Download Raspberry Pi OS Lite (64Bit)
Minimal image based on Debian 12 bookworm OS for Raspberry
https://www.raspberrypi.org/software/operating-systems/
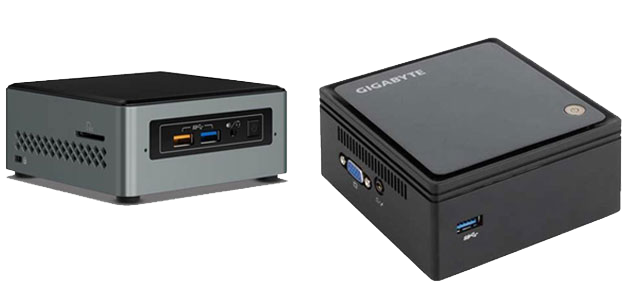
INTEL and AMD PC (AMD64)
Download Ubuntu 20.04.2 (Jammy) live server for amd64 which have a 6.03 kernel version
or Debian 11 Bullseye Netinst or Standard for amd64 with kernel version 5.15+
Minimal image amd64 (64 Bit) based for INTEL and AMD PC (NUC, PC, BRIX,…)
https://releases.ubuntu.com/jammy/
https://www.debian.org/releases/bullseye/
OTHERS DEVICES
Download Armbian Focal or Buster (Debian Buster 64Bit based) Lite for arm64
Minimal image based on Debian Buster 10 OS for a lot of boards using ARM
# armbian buster headless
https://www.armbian.com/download/
# Our MusicLounge Audiophile server distribution is provided for your convenience. The MusicLounge Audio Server is strictly based on the following distributions on which we have applied all the instructions provided on our website in order to make your job easier, however we strongly suggest to read our tutorials to get a full control on your audio system and customize your installation.
# Edition 2024
# for Raspberry PI 5 and PI 4 (64 Bit)
# Raspberry Pi OS Lite (bookworm – Debian 12) with Linux 6.6.20+, MPD 0.23.15, myMPD 15.02, Digital EQ, WEB Ready with PHP8.2,…
# img base: https://www.raspberrypi.org/software/operating-systems/
# source code: https://github.com/raspberrypi
# Edition 2023
# for the Odroid C4 arm64
# Armbian 22.11.4 Jammy core with Linux Kernel 6.0.13-meson64
https://www.armbian.com/odroid-c4/
Sour code: https://github.com/armbian
# for the Raspberry PI 4 armhf (32 Bit)
# Raspberry Pi OS Lite (bullseye) with Linux 5.15 – https://www.raspberrypi.org/software/operating-systems/
# Source code: https://github.com/raspberrypi
# for barebone x64 PC on amd64 platform (Intel NUC, Brix, …) we recommend Debian or
# Debian 11 NETINSTALL or standard https://www.debian.org/CD/http-ftp/#mirrors
# debian-live-11.6.0-amd64-netinst.iso or debian-live-11.6.0-amd64-standard.iso
# Source code: https://github.com/Debian
# Edition 2021
# for the Odroid C4
Sour code: https://github.com/armbian
# for the Raspberry PI 4
# Source code: https://github.com/raspberrypi
# for any barebone PC (Intel NUC, Brix, …)
# Source code: http://cdimage.ubuntu.com/releases/20.04/release/source/
# use “Win32 Disk Image” on Windows to create the SDCARD (8GB)
https://sourceforge.net/projects/win32diskimager/
# use rufus for creating a bootable usb stick with amd64 linux (Intel PC/NUC, Brix,…)
https://rufus.ie/en_US/#
# Notepad++ powerful text editor
https://notepad-plus-plus.org/downloads/
# on barebone PC with internal SSD use HDD Raw Copy 1.10+ Portable from HDGuru.com to clone the img to the SSD
Before going further, the info below is required:
– your gateway / router (internet box) / DNS IP address are required (192.168.x.x)
– if you’re not planning to store musics locally, the ip of your NAS or server PC with the sharing directory containing the music files is required (192.168.x.x)
# VERY IMPORTANT – SSH ON RASPBERRY PI
# RPI4 with Debian 11 (buster) only: add a empty file named “ssh” without extension (an empty file created with Notepad++ for example) to activate SSH at startup
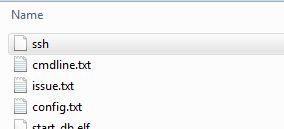
# RPI4 or 5 only: edit cmdline.txt with notepad++ for example and add net.ifnames=0 at the beginning

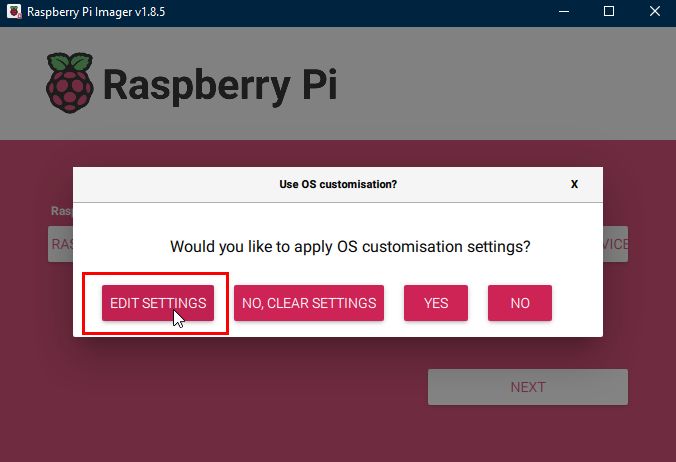
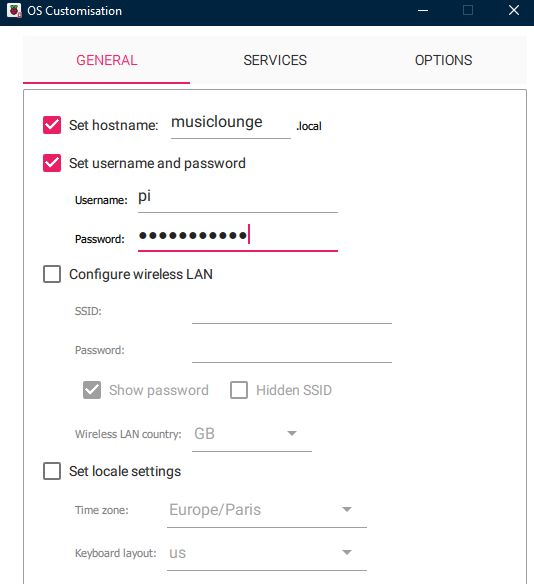
# on RPI4 or RPI5 with Debian 12 (bookworm): use the Raspberry Pi Imager to setup the hostname, the user account and ssh.


Or after the creation of your SDCARD just download and extract the files from the zip archive below onto your sdcard (ssh login:pi and password:musiclounge).
raspberry_boot_files
# Quick Overview:
# create the SDCard with raspiOS or debian lite or armbian or Odroid Ubuntu minimal distro (see the link above)
# DO NOT INSTALL Any Graphics Desktop Environments (GUI), we are building a HEADLESS server…
# insert the SD card inside the device
# connect device to your LAN network using the Ethernet cable
# connect your USB cable from your USB DAC to the device
(for raspberry pi 3b+ connect the usb dac to a powered usb hub and usb hub to the raspberry pi)
# connect your power supply (3A minimum for rPI 4, linear regulated power supply is better)
# Boot your device, start an ssh session from a remote PC and follow our tutorials to install and setup your audiophile server.
Click the button NEXT below to continue…