
# STEP3
# Now you have the IP assigned to your device, you need to start a ssh session from your (remote) PC,
# this is required to enter the commands and update/install all packages
# putty.exe utility is recommended on Windows, obviously Terminal app will be used on Linux and MacOS:
https://www.chiark.greenend.org.uk/~sgtatham/putty/latest.html
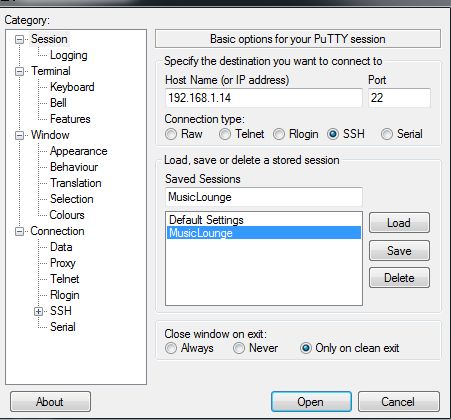
# on other OS, use SSH app or Terminal with ssh pi@192.168.x.x
# click yes and accept the fingerprint key the first time you connect to audio server
# For Linux noob the $ prefix in all commands on this website must NOT be copied, the ‘$’ prefix symbolizes the prompt
# Start the SSH session on Raspberry PI
$ login pi
# use the password of user pi your created during the installation (read the installation and activation of SSH on Debian 12 bookworm),
# ‘raspberry’ is the password by default of the Raspberry PI device
# all basic steps done! now you have the prompt:
pi@raspberrypi:~ $
# to change your password
# (password of our MusicLounge Audiophile distribution is musiclounge )
$ passwd
# START on other distro with only root user,
# we recommend to add a user “pi” (or other name) to mach all our tutorials
# if you use a minimal Ubuntu/Debian distro for Odroid or other boards
# we strongly suggest to read carefully the tutorial to prepare your linux distro before going further
Prepare Your Minimal (light) Linux Distro
https://linuxaudiofoundation.org/misc-preparing-a-minimal-linux-distro-odriod-c2-example/
#
# Congrats! your linux distro is ready, an ssh session is pending
# and the user pi has been created
# add user to sudoers after installation
$ sudo nano /etc/sudoers
# add the line below after root ALL=(ALL:ALL) ALL
# replace <pi> by your username
pi ALL=(ALL:ALL) ALL
# also, add www-data to allow driving the alsa equalizer (edition 2024)
www-data ALL=(mpd) NOPASSWD: /usr/bin/amixer
# save
CTRL+X then Y then ENTER
# create at least Downloads and scripts directories if they do not exist
$ mkdir Downloads$ mkdir scripts
# ready to start!
# STEP4
# intial configuration, change the default hostname
# skip this step if you already configure the hostname musiclounge during the installation process
# if you intend to create a multi-rooms audiophile configuration sharing the same music library on your LAN network
# do not forget to change the hostname to avoid conflict between each audio server (see the corresponding tutorial)
# we suggest a name including ml for musiclounge followed by the room name (e.g mlbedroom, mllivingroom, mlkitchen,…)
# check your current settings
hostnamectl
# and change it to musiclounge if needed
# on Raspberry PI type:
$ sudo raspi-config
# 0 network options: hostname choose replace raspberrypi by musiclounge for example
# 1 setup localisation choose with SPACE bar en US UTF8 only
# 2 expand SDCARD partition (Advanced Options/Expand)
# on Odroid C4 (Armbian arm64)
# launch armbian-config to make the same changes on ARM based device like on the Odroid C2 or C4
$ sudo armbian-config
# to change the hostname manually
sudo hostnamectl set-hostname musiclounge
# check the hostname
hostnamectl
# check /etc/hostname entry
$ sudo nano /etc/hostname
musiclounge
# check /etc/hosts entry
$ sudo nano /etc/hosts
127.0.0.1       localhost
127.0.1.1       musiclounge

# The following lines are desirable for IPv6 capable hosts
::1     localhost ip6-localhost ip6-loopback
ff02::1 ip6-allnodes
ff02::2 ip6-allrouters
# Optional sanity check
sudo apt updatesudo apt upgrade -y
# reboot the system
sudo reboot
# restart a SSH session
$ login pi
Click the button NEXT below to continue…